设计模式与原则
# 设计模式与原则
参考教程
[TOC]
# 一、预备知识
# 1.1 开发环境
// 淘宝镜像:taobao.org上找
npm init
npm install webpack webpack-cli --save-dev
npm install webpack-dev-server html-webpack-plugin --save-dev
npm install babel-core babel-loader babel-polyfill babel-preset-es2015 babel-preset-latest --save-dev
1
2
3
4
5
2
3
4
5
// webpack.dev.config.js

// CommomJS规范下的引入模板
const path = require('path')
const HtmlWebpackPlugin = require('html-webpack-plugin')

module.exports = {
  entry: './src/index.js',

  output: {
    // 路径,当前文件夹目录下
    path: __dirname,
    filename: './release/bundle.js'
  },

  module: {
    rules: [{
      // 匹配js文件
      test: /\.js$/,
      // 排除对node_modules文件夹的文件匹配
      exclude: /(node_modules)/,
      // 用babel-loader插件将es6转换为es5
      loader: 'babel-loader'
    }]
  },

  plugins: [
    new HtmlWebpackPlugin({
      template: './index.html'
    })
  ],

  devServer: {
    // 本地开发环境服务器
    // 源文件修改后,服务器会自动刷新
    // 根目录
    contentBase: path.join(__dirname, './release'),
    // 自动打开浏览器
    open: true,
    port: 9000
  }
}
1
2
3
4
5
6
7
8
9
10
11
12
13
14
15
16
17
18
19
20
21
22
23
24
25
26
27
28
29
30
31
32
33
34
35
36
37
38
39
40
41
42
2
3
4
5
6
7
8
9
10
11
12
13
14
15
16
17
18
19
20
21
22
23
24
25
26
27
28
29
30
31
32
33
34
35
36
37
38
39
40
41
42
// .babelrc
{
    "presets": [
        "es2015",
        "latest"
    ],
    "plugins": []
}
1
2
3
4
5
6
7
8
2
3
4
5
6
7
8
- 其他
$ npm install http-server -g
$ http-server -p 8881
localhost://8881/test.html
1
2
3
2
3
# 1.1.2 UML类图
Unified Modeling Language 统一建模语言
- 画图工具:https://www.processon.com
- 关系
- 泛化,表示继承 - 空心箭头
- 关联,表示引用 - 实心箭头
- 题目
第一题
打车时,可以打专车或者快车。任何车都有车牌号和名称。 不同车价格不同,快车每公里1元,专车每公里2元。 行程开始时,显示车辆信息。 行程结束时,显示打车金额(假定行程就5公里)。
class Car {
  constructor(number, name) {
    this.number = number;
    this.name = name;
  }
}

class Kuaiche extends Car {
  constructor(number, name) {
    super(number, name);
    this.price = 1;
  }
}

class Zhuanche extends Car {
  constructor(number, name) {
    super(number, name);
    this.price = 2;
  }
}

class Trip {
  constructor(car) {
    this.car = car;
  }
  start() {
    console.log(`trip start: name-${this.car.name}, number-${this.car.number}`);
  }
  end() {
    console.log(`trip end: price-${this.car.price * 5}`);
  }
}

let car = new Kuaiche(1200,'daben');
let trip = new Trip(car);
trip.start();
trip.end();
1
2
3
4
5
6
7
8
9
10
11
12
13
14
15
16
17
18
19
20
21
22
23
24
25
26
27
28
29
30
31
32
33
34
35
36
37
2
3
4
5
6
7
8
9
10
11
12
13
14
15
16
17
18
19
20
21
22
23
24
25
26
27
28
29
30
31
32
33
34
35
36
37
第二题
某停车场,分3层,每层100车位。 每个车位都能监控到车辆的驶入和离开。 车辆进入前,显示每层的空余车位数量。 车辆进入时,摄像头可识别车牌号和时间。 车辆出来时,出口显示器显示车牌号和停车时长。
# 二、设计原则
必看的书籍:《UNIX/LINUX设计哲学》
- 准则:
- 1:小即是美
- 2:让每个程序只做好一件事
- 3:快速建立原型
- 4:舍弃好效率而取可移植性
- 5:采用纯文本来存储数据
- 6:充分利用软件的杠杆效应(软件复用)
- 7:使用shell脚本来提高杠杆效应和可移植性
- 8:避免强制性的用户界面
- 9:让每个程序都成为过滤器
- 小准则:
- 1:允许用户定制环境
- 2:尽量使操作系统内核小而轻量化
- 3:使用小写字母并尽量简短
- 4:沉默是金
- 5:各部分之和大于整体
- 6:寻求90%的解决方案
# 2.1 SOLID 五大设计原则
# 2.1.1 S - 单一职责原则*
- 一个程序只做好一件事。
- 如果功能过于复杂就拆分开,每个部分保持独立。
# 2.1.2 O - 开放封闭原则*
- 对扩展开发,对修改封闭。
- 增加需求时,扩展新代码,而非修改已有代码。
- 这是软件设计的终极目标。
// 用Promise来说明S O
// S: 每个 then 中的逻辑只做好一件事
// O:如果新增需求,扩展then即可

// 加载图片
function loadImg(src) {
    return new Promise(function (resolve, reject) {
        let img = document.createElement('img');
        img.onload = ()=>resolve(img);
        img.onerror = ()=>reject('load img fail');
        img.src = src;
    });
}

let result = loadImg('XXX.png');
result.then((img)=>img)
    .then((img)=>console.log(img))
    .catch((error)=>console.log(error))	// 统一捕获异常
1
2
3
4
5
6
7
8
9
10
11
12
13
14
15
16
17
18
2
3
4
5
6
7
8
9
10
11
12
13
14
15
16
17
18
# 2.1.3 L - 李氏置换原则
- 子类能覆盖父类。
- 父类能出现的地方,子类就能出现。
- JS中使用较少(弱类型 & 继承使用较少)。
# 2.1.4 I - 接口独立原则
- 保持接口的单一独立,避免出现”胖接口“。
- JS中没有接口(ts例外),使用较少。
- 类似于单一职责原则,这里更关注接口。
# 2.1.5 D - 依赖倒置原则
- 面向接口编程,依赖于抽象而不依赖于具体。
- 使用方只关注接口而不关注具体类的实现。
- JS中使用较少(没有接口&弱类型)。
# 三、模式
# 3.1 创建型
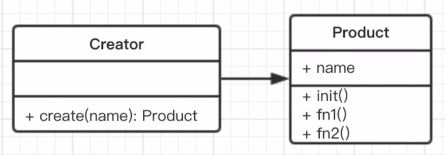
# 3.1.1 工厂模式*
- 介绍
- 将new操作单独封装。
- 遇到new时,就要考虑是否该使用工厂模式。

class Product {
  constructor(name) {
    this.name = name;
  }
  fn1() {
    console.log('fn1');
  }
  fn2() {
    console.log('fn2');
  }
}

class Creator {
  create(name) {
    return new Product(name);
  }
}

let creator = new Creator();
let p = creator.create('p1');
p.fn1();
p.fn2();
1
2
3
4
5
6
7
8
9
10
11
12
13
14
15
16
17
18
19
20
21
22
2
3
4
5
6
7
8
9
10
11
12
13
14
15
16
17
18
19
20
21
22
场景
- JQuery: $(‘div')
- React.createElement
class Vnode(tag, attrs, children) {
    // ...
}
React.createElement = function (tag, attrs, children) {
    return new Vnode(tag, attrs, children)
}
1
2
3
4
5
6- vue异步组件
验证
- 构造函数和创建者分离
- 符合开放封闭原则
# 3.1.2 单例模式*
- 介绍
- 系统中被唯一使用。
- 一个类只用一个实例。
class singleObj {
  login() {
    console.log('login');
  }
}

// 闭包
singleObj.getInstance = (function () {
  let instance;
  // console.log(this);// window
  return function () {
    // console.log(this);// singleObj
    return instance = instance || new singleObj();;
  }
})();

let obj1 = singleObj.getInstance();
let obj2 = singleObj.getInstance();
obj1 === obj2	// true

let obj3 = new singleObj();
obj1 === obj3	// false
1
2
3
4
5
6
7
8
9
10
11
12
13
14
15
16
17
18
19
20
21
22
2
3
4
5
6
7
8
9
10
11
12
13
14
15
16
17
18
19
20
21
22
场景
- jQuery 只有一个 $
if (window.jQuery != null) {
    return window.jQuery;
} else {
    // init...
}
1
2
3
4
5登录框
vuex 和 redux 中的 store
创建唯一的浮窗
let getSingle = function( fn ){
   let result;
   return function(){
       return result || ( result = fn .apply(this, arguments ) );
   }
};
let createLoginLayer = function(){
    let div = document.createElement( 'div' );
    div.innerHTML = '我是登录浮窗';
    document.body.appendChild( div );
    return div;
};

let createSingleLoginLayer = getSingle( createLoginLayer );
1
2
3
4
5
6
7
8
9
10
11
12
13
14
2
3
4
5
6
7
8
9
10
11
12
13
14
# 3.1.3 原型模式
clone自己,生成一个新对象。
应用: Object.create
# 3.2 结构型
# 3.2.1 适配器模式*
- 介绍
- 旧接口格式和使用者不兼容。
- 中间加一个适配转换接口。

class Adaptee {
  oldRequest() {
    return 'old';
  }
}

class Target {
  constructor() {
    this.adaptee = new Adaptee();
  }
  request() {
    let info = this.adaptee.oldRequest();
    return `${info} - conver -> new`
  }
}

let target = new Target();
console.log(target.request());
// old - conver -> new
1
2
3
4
5
6
7
8
9
10
11
12
13
14
15
16
17
18
19
2
3
4
5
6
7
8
9
10
11
12
13
14
15
16
17
18
19
场景
- 封装旧接口
// 自己封装的 Ajax
ajax({
    url:'/getData',
    type:'POST',
    dataType:'json',
    data:{
        id:"123"
    }
})
.done(function(){});

// 历史原因
$.ajax({
    //...
});

// 做一层适配器
let $ = {
    ajax: function (options) {
        return ajax(options);
    }
}
1
2
3
4
5
6
7
8
9
10
11
12
13
14
15
16
17
18
19
20
21
22
2
3
4
5
6
7
8
9
10
11
12
13
14
15
16
17
18
19
20
21
22
- vue computed
# 3.2.2 装饰器模式
- 介绍
- 为对象添加新功能。
- 不改变其原有的结构和功能。

class Circle {
  draw() {
    console.log('draw a circle');
  }
}

class Decorator {
  constructor(circle) {
    this.circle = circle;
  }
  draw(){
    this.circle.draw();
    this.setColor(circle);
  }
  setColor(circle) {
    console.log(`add color to circle`);
  }
}

let circle = new Circle();
circle.draw();

let decorator = new Decorator(circle);
decorator.draw();

// draw a circle
// draw a circle
// add color to circle
1
2
3
4
5
6
7
8
9
10
11
12
13
14
15
16
17
18
19
20
21
22
23
24
25
26
27
28
2
3
4
5
6
7
8
9
10
11
12
13
14
15
16
17
18
19
20
21
22
23
24
25
26
27
28
场景
ES7装饰器
- 配置环境
npm i babel-core babel-plugin-transform-decorators-legacy -D1- .babelrc
"plugins":["transform-decorators-legacy"]1
// 修饰器: 编译时执行的函数
@decorator
class A {}
// 等同于
class A {}
A = decorator(A) || A;

// 修饰器只能用于类和类的方法,不能用于函数,因为存在函数提升,而类不会提升。
1
2
3
4
5
6
7
8
2
3
4
5
6
7
8
// mixin模式:一个对象中混入另外一个对象的方法。(对象继承)
const Foo = {
    foo() { console.log('foo') }
};
class MyClass {}
Object.assign(myClass.prototype, Foo);
let obj = new MyClass();
obj.foo();	// 'foo'


// 修饰器实现
// minxins.js
export function mixins(...list) {
    return function (target) {
        Object.assign(target.prototype, ...list);
    };
}

// index.js
import { mixins } from './mixins';
const Foo = {
    foo() { console.log('foo') }
};
@mixins(Foo)
class MyClass {}
let obj = new MyClass();
obj.foo();	// 'foo'
1
2
3
4
5
6
7
8
9
10
11
12
13
14
15
16
17
18
19
20
21
22
23
24
25
26
27
2
3
4
5
6
7
8
9
10
11
12
13
14
15
16
17
18
19
20
21
22
23
24
25
26
27
- core-decorators
// npm i core-decorators --save
import { readonly } from 'core-decorators';

class Meal {
  @readonly
  entree = 'steak';
}

let dinner = new Meal();
dinner.entree = 'salmon';
// Cannot assign to read only property 'entree' of [Object Object]
1
2
3
4
5
6
7
8
9
10
11
2
3
4
5
6
7
8
9
10
11
# 3.2.3 代理模式*
- 介绍
- 使用者无权访问目标对象。
- 中间加代理,通过代理做授权和控制。


class RealImg {
    constructor(fileName) {
        this.fileName = fileName;
    }
    display() {
        console.log('display ' + this.fileName)
    }
}

class ProxyImg {
    constructor(fileName) {
        this.realImg = new RealImg(fileName);
    }
    display() {
        this.realImg.display();
    }
}

let proxyImg = new ProxyImg('1.png');
proxyImg.display();

// display 1.png
1
2
3
4
5
6
7
8
9
10
11
12
13
14
15
16
17
18
19
20
21
22
2
3
4
5
6
7
8
9
10
11
12
13
14
15
16
17
18
19
20
21
22
场景
- 网页事件代理 - 事件委托
<div id="div1">
    <a href="#">a1</a>
    <a href="#">a2</a>
</div>

<script>
	let div1 = document.getElementById('div1');
    div1.addEventListener('click', function(e) {
        let target = e.target;
        if (target.nodeName === 'A') {
            console.log(target.innerHTML);
        }
    });
</script>
1
2
3
4
5
6
7
8
9
10
11
12
13
14- jQuery $.proxy
// 常用
$('#div1').click(function() {
    let _this = this;
    setTimoeout(function() {
        _this.css('background-color','yellow');
    }, 1000);
});

// 箭头函数
$('#div1').click(function() {
    setTimoeout(() => {
        this.css('background-color','yellow');
    }, 1000);
});

// JQuery
$('#div1').click(function() {
    setTimoeout($.proxy(function() {
        _this.css('background-color','yellow');
    }, this), 1000);
});
1
2
3
4
5
6
7
8
9
10
11
12
13
14
15
16
17
18
19
20
21- ES6 proxy
// 明星
let star = {
    name: 'Lin',
    age: 22,
    phone: '10086'
};

// 经纪人
let agent = new Proxy(star, {
    get: function (target, key) {
        if (key === 'phone') {
            return '10000';
        }
        if (key === 'price') {
            return '120000RMB';
        }
        return target[key];
    },
    set: function (target, key, val) {
        if (key === 'customPrice') {
            if (val < 120000) {
                throw new Error('too low');
            } else {
                target[key] = val;
                return true;
            }
        }
    }
})

console.log(agent.name);  // Lin
console.log(agent.age);   // 22
console.log(agent.phone); // 10000
console.log(agent.price); // 120000RMB

agent.customPrice = 150000;
console.log(agent.customPrice); // 150000
agent.customPrice = 100000;
console.log(agent.customPrice); // Error: too low
1
2
3
4
5
6
7
8
9
10
11
12
13
14
15
16
17
18
19
20
21
22
23
24
25
26
27
28
29
30
31
32
33
34
35
36
37
38
39
# 3.2.3.1 代理模式 VS 适配器模式
适配器模式:提供一个不同的接口(如不同版本的插头)。
代理模式:提供一摸一样的接口。
# 3.2.3.2 代理模式 VS 装饰器模式
- 装饰器模式:扩展功能,原有功能不变且可直接使用。
- 代理模式:显示原有功能,但是经过限制或者阉割之后的。
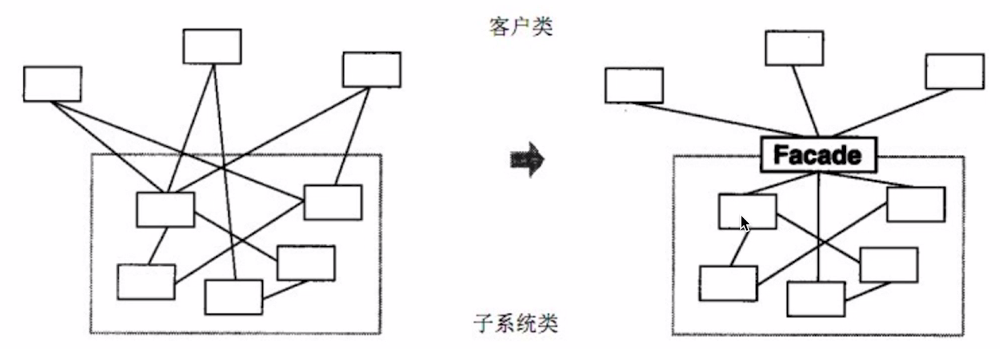
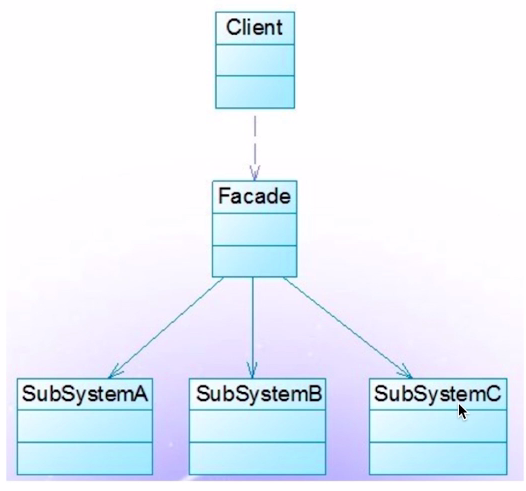
# 3.2.4 外观模式*
- 介绍
- 为子系统中的一组接口提供了一个高层接口。
- 使用者使用这个高层接口。


- 验证
- 不符合单一职责原则和开放封闭原则。
- 谨慎使用,不可滥用。
- 优点:使用者不需要理解内部实现逻辑,主要用于第三方库。
# 3.2.5 其他模式
# 3.2.5.1 桥接模式
- 用于把抽象化与实现化解耦,使二者可以独立变化。
# 3.2.5.2 组合模式
- 生成树形结构,表示“整体-部分”关系。
- 让整体和部分都具有一致的操作方式。
# 3.2.5.3 享元模式
- 共享内存(主要考虑内存,而非效率)。
- 相同的数据,共享使用。
# 3.3 行为型
# 3.3.1 发布订阅(观察者)模式*
- 介绍
- 发布 & 订阅。
- 一对多。
class Dep {
    constructor() {
        this.subs = [];
    }
    addSub(sub) {
        this.subs.push(...sub);
    }
    notify(value) {
        this.subs.forEach(v => {
            v.update(value);
        });
    }
}

class Watch {
    constructor(name) {
        this.name = name;
    }
    update(value) {
        console.log(`${this.name} ${value}`);
    }
}

let dep = new Dep();
let w1 = new Watch('w1');
let w2 = new Watch('w2');
dep.addSub([w1, w2]);
dep.notify('updated');
// w1 updated
// w2 updated
1
2
3
4
5
6
7
8
9
10
11
12
13
14
15
16
17
18
19
20
21
22
23
24
25
26
27
28
29
30
2
3
4
5
6
7
8
9
10
11
12
13
14
15
16
17
18
19
20
21
22
23
24
25
26
27
28
29
30
场景
- 网页事件绑定
document.body.addEventListener('click',function(){
    alert(1);
});
document.body.addEventListener('click',function(){
    alert(2);
});
document.body.addEventListener('click',function(){
    alert(3);
});
// 模拟用户点击
document.body.click();
1
2
3
4
5
6
7
8
9
10
11- Promise
promise.then().then()1- jQuery callbacks
- nodejs 自定义事件
- nodejs 中:处理http请求;多进程通讯
- vue 和 React 组件生命周期触发
- vue watch
# 3.3.2 迭代器模式*
- 介绍
- 顺序访问一个集合。
- 使用者无需知道集合的内部结构(封装)。

class Iterator {
    constructor(container) {
        this.list = container.list;
        this.index = 0;
    }
    next() {
        return this.index < this.list.length ? {
            value: this.list[this.index++],
            done: false
        } : {
            value: undefined,
            done: true
        };
    }
}

class Container {
    constructor(list) {
        this.list = list;
    }
    // 生成遍历器
    getIterator() {
        return new Iterator(this);
    }
}

let container = new Container(['a', 'b', 'c']);
let iterator = container.getIterator();
let res = {};
do {
    res = iterator.next();
    console.log(res);
} while (!res.done);

// {value: 'a', done: false}
// {value: 'b', done: false}
// {value: 'c', done: false}
// {value: undefined, done: true}
1
2
3
4
5
6
7
8
9
10
11
12
13
14
15
16
17
18
19
20
21
22
23
24
25
26
27
28
29
30
31
32
33
34
35
36
37
38
2
3
4
5
6
7
8
9
10
11
12
13
14
15
16
17
18
19
20
21
22
23
24
25
26
27
28
29
30
31
32
33
34
35
36
37
38
- 场景
- ES6 Iterator
# 3.3.3 状态模式*
- 介绍
- 一个对象有状态变化。
- 每次状态变化都会触发一个逻辑。
- 不能总是用if-else来控制。

class State {
    constructor(color) {
        this.color = color;
    }
    handle(context) {
        console.log(`turn ${this.color}`);
        context.setState(this);
    }
}

class Context {
    constructor() {
        this.state = null;
    }
    getState() {
        return this.state;
    }
    setState(state) {
        this.state = state;
    }
}

let context = new Context();

let green = new State('green');
let yellow = new State('yellow');

green.handle(context);	// turn green
context.getState();		// State {color: "green"}
yellow.handle(context); // turn yellow
context.getState();		// State {color: "yellow"}
1
2
3
4
5
6
7
8
9
10
11
12
13
14
15
16
17
18
19
20
21
22
23
24
25
26
27
28
29
30
31
2
3
4
5
6
7
8
9
10
11
12
13
14
15
16
17
18
19
20
21
22
23
24
25
26
27
28
29
30
31
- 场景
- 有限状态机
# 3.3.4 其他模式
# 3.3.4.1 模板方法模式
# 3.3.4.2 职责模式
# 3.3.4.3 命令模式
- 执行命令时,发布者和执行者分开。
- 中间加入命令对象,作为中转站。
# 3.3.4.4 备忘录模式
- 随时记录一个对象的状态变化。
- 随时可以恢复之前的某个状态(如撤销功能)。
# 3.3.4.5 访问者模式
- 将数据操作和数据结构分开。
# 3.3.4.6 中介者模式
# 3.3.4.7 解释器模式
- 描述语言语法如何定义,如何解释和编译。
# 3.3.4.8 策略模式
- 不同策略分开处理。
- 避免出现大量if-else或者switch-else。

